
DragonDMS has an integration with Sage50 Accounts. All transactions entered in DragonDMS can be posted to Sage50 when the integration is run. Using the integration means only entering the data into one system, improving your efficiency.
Integration Dates & Sage Version
In order to integrate to Sage50 Accounts you need to enter the version of your Sage50 software and the data path (i.e where the Sage data is installed on your computer / network)

The Sage Integration Date is key to the integration. When first setting up the integration you choose the date from which you want to integrate. Any transactions in DragonDMS dated before this date will not be posted to Sage.
Going forward the Sage Integration Date will automatically change to a 4 month rolling date, if you need to have an integration date that looks back further than 4 months contact our Support Team.
The Service Work in Progress date is only applicable to companies that use the Service module and have included work in progress in their integration. Work in progress journals post the current value of the open service jobs to Sage each time the integration is run. When the service job is invoiced off these journals will be reversed and the sales figures will be posted.
The Parts Stock Adjustment date is only applicable to companies that use the Parts module for stock parts. When manual stock adjustments are made within DragonDMS (i.e stock checking) stock journals will be posted to Sage to reflect these changes.
Items to Post to Sage
The transactions that get posted to Sage from DragonDMS are split into three categories:-
Car Sales Transactions, Parts Transactions and Service Transactions
You can decide which items you want to be posted by ticking each item.
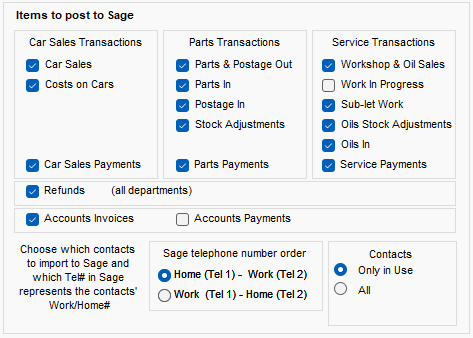
Contacts in the DragonDMS will also be posted to Sage. You need to select which contacts are posted to Sage, we recommend selecting ‘Only in Use’ as this will only post contacts that have transactions against them. You also need to select the telephone number order.
Default Nominal Codes
DragonDMS has a full set of nominal codes, it is recommended that you use the DragonDMS default codes, however the nominal codes can be edited in DragonDMS if required.
To view the default nominal codes go to Settings > Accounts > Nominal Codes the full list of nominal codes will be displayed. Click on Print Default Nominal Structure to view a report that shows the nominal codes for each department i.e. car sales departments, service departments and parts departments.