
To enable the invoicing features, please email csm@dragon2000.co.uk
Once enabled, you will be able to create both Purchase and Sales invoices within Dragon Portal.
Purchase Invoices
Adding a Supplier
From within the Vehicle Record, select the Customer / Supplier section and select Supplier from the menu options on the left hand side:
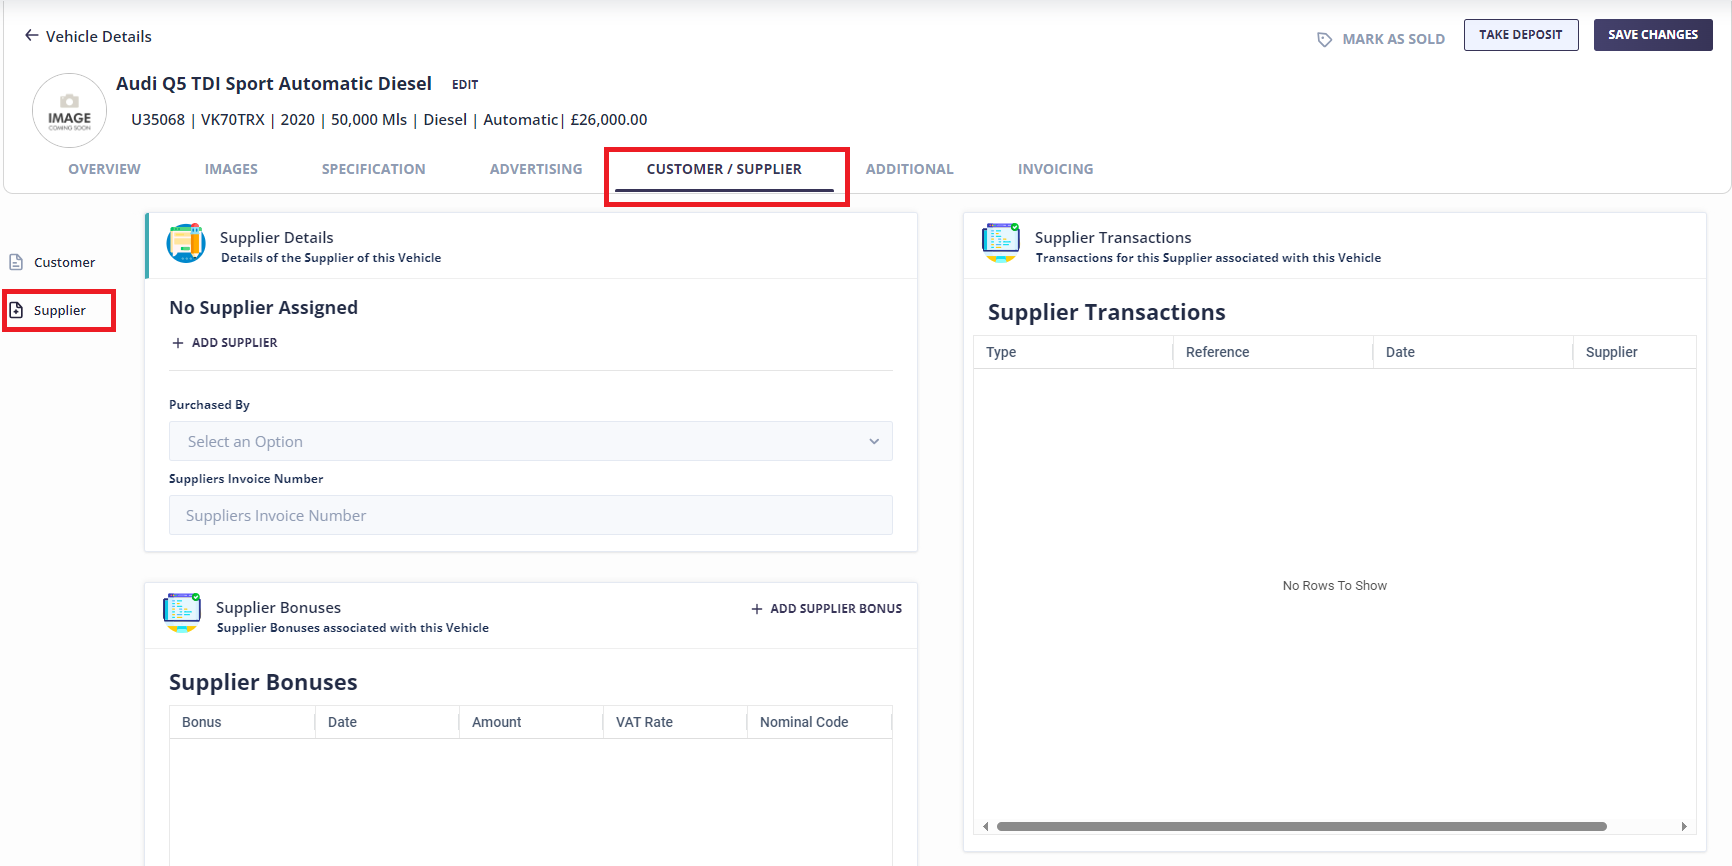
Enter the details of who you purchased the vehicle from by clicking Add Supplier. If you have used the Supplier previously you can search for the supplier and select the relevant record. To add a new supplier click Create a New Supplier and fill in the details.
Setting the Purchase Price
Select the Invoicing section and the Purchase option from the left hand menu options:
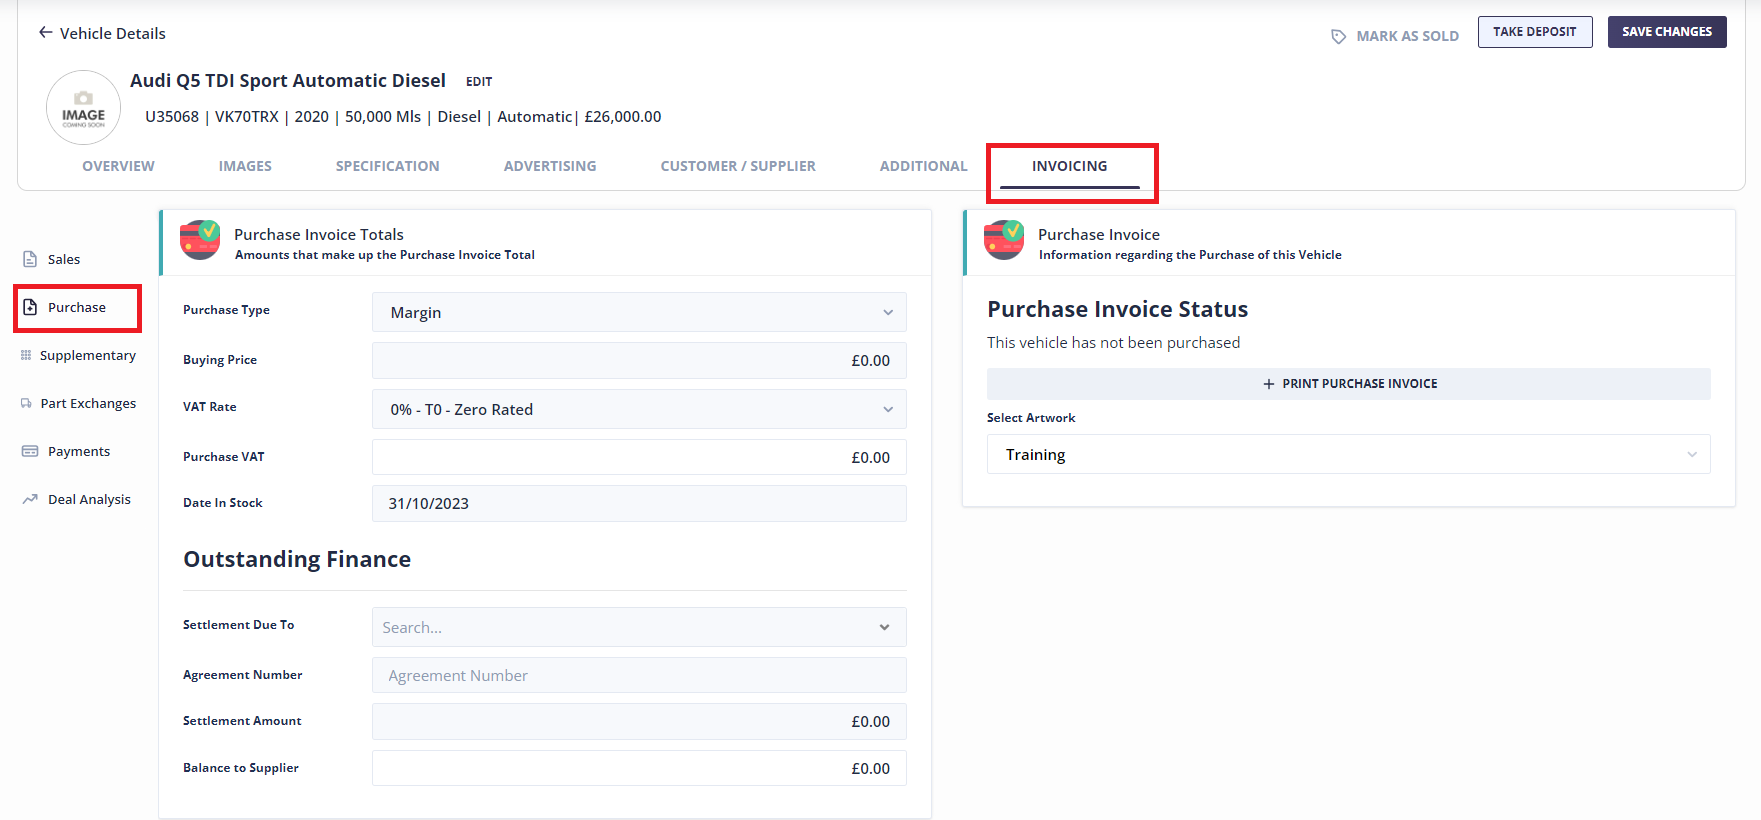
Purchase Type – From the drop down list select the relevant Purchase Type. Margin, Qualifying etc.
Buying Price – Enter the amount you have purchased the vehicle for (this does not include any costs, just the price of the vehicle)
Date in Stock – This is the date you have the vehicle onsite, not the date you have purchased the vehicle
Outstanding Finance – If applicable, enter any outstanding finance against the vehicle
Adding Costs
If you have any other costs associated with the purchase of the vehicle, for example, delivery, Click the Additional section and then Extras & Costs from the menu options on the left hand side:

Click Add Cost and enter the cost Description, Supplier, Date and Price. Click Add Cost to save.
Printing the Purchase Invoice
Once you are happy with all of the information entered, go back to Invoicing > Purchase and click on Print Purchase Invoice. Enter the date you purchased the vehicle and click Print Purchase Invoice.
The Purchase Invoice will be displayed. This needs to either be printed or saved to PDF to lock and save the purchase information that has been entered. One this has been done, a purchase invoice number will be allocated and the purchase information cannot be edited.
Sales Invoices
Adding a Customer
From within the Vehicle Record, select the Customer / Supplier section and select Customer from the menu options on the left hand side:
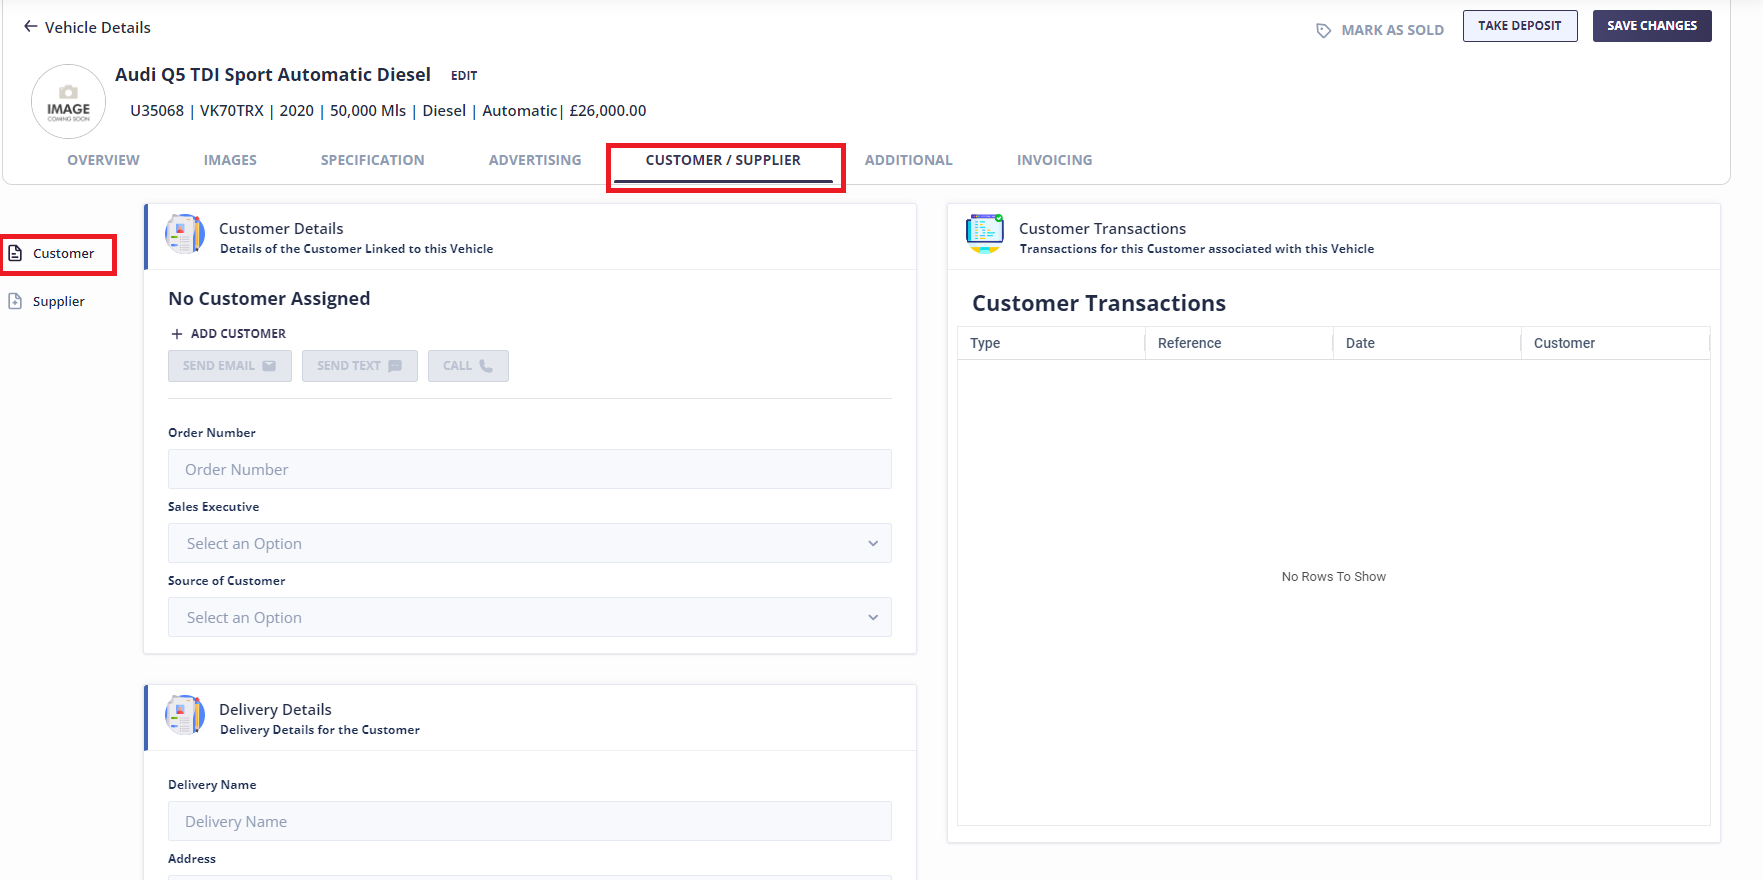
Enter the customer details by clicking Add Customer. If you have had previous dealings with this customer then you can search for the details and select the relevant record. To add a new customer click Create a New Customer and fill in the details.
If the delivery address will be different, this information can be entered under Delivery Details.
Selling Price
From within the Vehicle Record, select the Invoicing section and Sales from the left hand menu options.
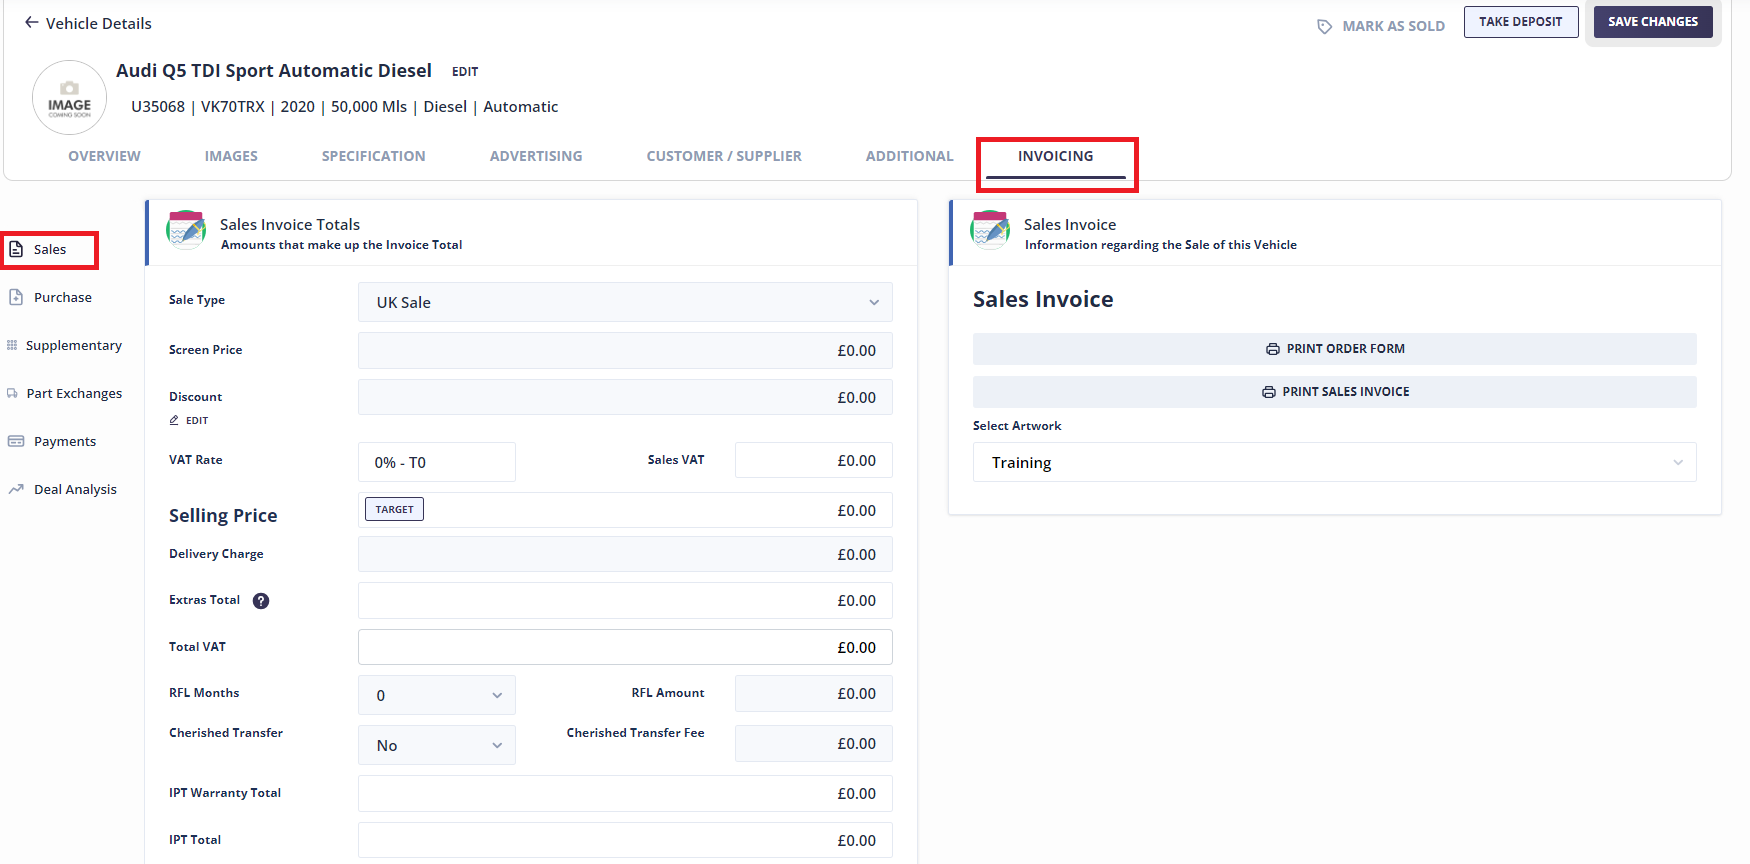
Enter the Screen Price of the vehicle. This is how much you are selling/have sold the vehicle for.
Part Exchange
Within the Invoicing section, select Part Exchange from the left hand menu options. Click Add Part Exchange and Create New Vehicle. Enter the registration and mileage.
Once the part exchange has been added, use the Buying Price box to enter the amount you are purchasing the vehicle for.
Extras, Warranty & Finance
These can all be added within the Additional section of the record.
Extra’s – An extra can be any item that you would like to list on the sales invoice. Click Extras & Costs from the menu options and then Add Extra. Enter a description and selling price. If applicable, you can also record any costs you have incurred for this item in the Cost to Dealership section.
Warranties – Use this section to add any warranty products that the customer has purchased. Click Finance/Warranty from the menu options and Add Warranty. Select if it is an IPT (Insurance Premium Tax) or NON-IPT warranty product. Enter a description and selling price. If applicable, you can also record any costs you have incurred for the product in the Cost to Dealership section.
Finance – If the customer is using finance to purchase the vehicle, you can enter the Finance Company and Finance Amount. Select Finance/Warranty from the menu options and enter the details within the Vehicle Sale Finance section.
If you want to record any further details of the finance, this can be done under the Sale Finance section but this is not required.
Payments
To record a payment go to Invoicing and select Payments from the left hand menu options. Click Add Payment. Any payments added before the Sales Invoice has been printed will be recorded as deposit payments. Once the Sales Invoice has been printed, all payments will be recorded as balance payments.
Enter the payment amount you have received and click Next. Select a payment method, payment date and if applicable, enter a reference. Click Save once done.
Order Forms and Invoices
Go to the Invoicing section and select Sales from the left hand menu. You will have the option to Print Order Form and Print Sales Invoice.
The order form can be printed multiple times and once printed, changes can still be made to the record.
Once the Sales Invoice has been printed, this will lock the record so no changes can be made and the vehicle record will be moved into Sold Vehicles. When printing the Sales Invoice, you will also be asked to enter the Sale Date.